
This involves a the creation of a number of overlapping layered projections, set along the path of the camera path
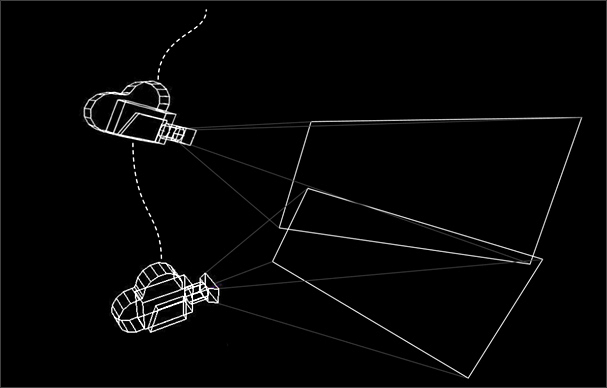
I have attempted to describe this visually (below).
Think of a shot camera sweeping from left to right revealing a panorama. Unless you have a full 360° panoramic image of the environment then you will need more than one painting to maintain coverage of that area throughout the full camera move and each image would need to be projected from a different position along the camera path. The position of these projection camera would need to allow coverage of the missing image information but allowing some overlap with the previous projection. Overlap is necessary so the matte painter can blend them together to create a seamless stitch.
I have produced a short screencast demonstrating application of the technique using Nuke.
The video (below) shows my experimentation with this technique.
Checkerboard
Whilst constructing the screencast demonstration of the coverage projection (see above), it became apparent that the geometric pattern, provided by the checkerboard node, will be extremely useful testing and clarity of demonstration. I therefore anticipate that I will be using this node extensively as a proxy for the projected matte painting.
I also anticipate that, in future tests, I will need to project multiple checkerboards onto the scene geometry and, when doing so, it will be important to be able to differentiate one checkerboard from another. This is because, in a real world project, these would be separate images, or at least separate layers from the same image.
During recording of the coverage projection demo, I had to duplicate and re-colour the checkerboard, so as to differentiate between the two elements. Whilst it is difficult to think of this as ‘hard labour’, I can imagine that having to do this several times, every time I perform a test, will be tedious.
This lead me to construct a custom node (which I have named ‘checkmate’), which will allow me to add to any Nuke script and quickly cycle through, and select from, a set of pre-made colour swatches.
To briefly summarise its construction, several checkerboards were coloured and inputted into a switch node.

When these nodes are grouped, an output is added. This allows the node to be connected to other nodes as part of a tree.
I used a simple expression, connected to a custom slider control, which allows the user to traverse through the checkerboards, simply by moving the slider

The group node can be exported as a Gizmo. This allows the tool to be installed and made accessible via a menu.
This image shows a toolbar on my local machine with two tools installed, one of which is the checkerboard gizmo.

A small Python script in the installation folder creates the toolbar and link.

This short screencast (below) demonstrates how this tool works:
