
During my initial experimentation with projection types, I have encountered three projection artefacts that the matte painter must be able to deal with.
Smearing
Smearing is synonymous with a streaking of the texture across the glancing angle of an object.
It occurs when the movement of the shot camera reaches a point where the projection camera could not see any geometry on which to project. The very last visible pixel along the offending edge is then stretched to fill the geometry UV’s
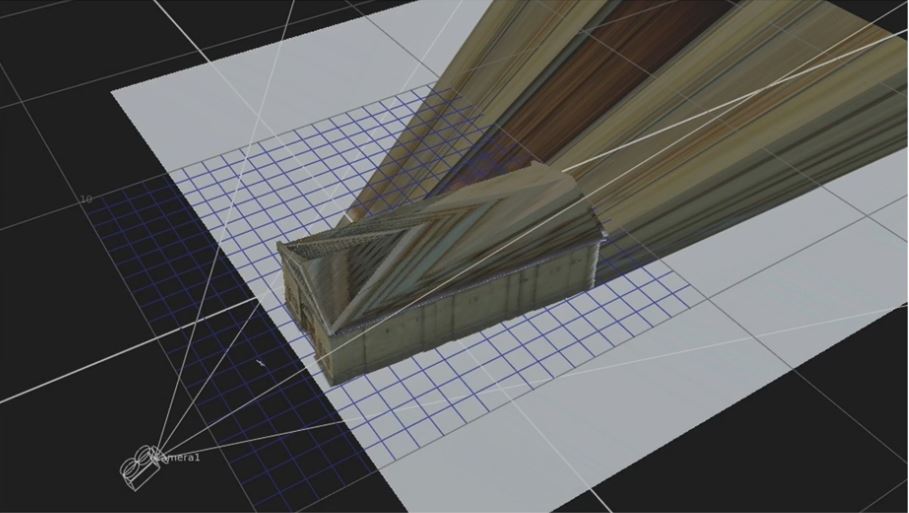
The image (below) shows the projection of a texture onto this building façade. From the perspective of the projection camera, the image looks good on the front and side faces.

The image (below) shows the building from a different camera position, which could be at some point along the motion path of the shot camera.
From the perspective of the projection camera, there is only a small section of the side façade visible, let’s say 300 pixels wide.
However, from the second camera position, this area is 3-4-times wider and consequently, the projection has stretched this part of the texture, by that amount, to fill the space.
However what is most apparent is the roof area. From the perspective of the projection camera, there is absolutely no texture information to define this part of the building and consequently the texture is smeared across the roof face to fill the UV’s

The implication here is that, if the movement of the shot camera reveals these faces, then additional projections, from various positions along the path of the shot camera, would be necessary to make this image work. Moreover these projection cameras would need to project additional texture to correctly define these faces.
Doubling
Doubling occurs when the material being projected passes through the geometry and projects onto other 3D surfaces behind.
This seems counter-intuitive and opposite of what you would expect in the real world. If a part of my body gets in-between a projector and a screen, then part of the image will be projected onto me and the area where my shadow is cast, will be black. The image is not going to pass through my body but, in computer 3D, projections pass all the way through objects.
In the image (below) it good correct from this point of view.

However, in this image, we see the projection doubling onto the ground plane behind.
Moreover, if there were other buildings, behind the target building, but in the path of the camera, then the texture would project onto these as well. So, when the shot camera moves, all this texture doubling will become visible.
The solution is to create additional projections. For example have separate layered projections for the building and the ground, or additional projections to patch over any doubling visible from the perspective of the shot camera.
Resolution
This arises when the shot camera is pushing in on a matte painting, most likely as a ‘nested’ projection, at some point you reach the threshold at which the resolution of the image, as seen through the shot camera, is exceeded. From this point, any further progression of the shot camera towards the image. Most digital artists recognise this as a ‘blurring’ or ‘softening’ of the image and, at its most extreme ‘pixilation’.
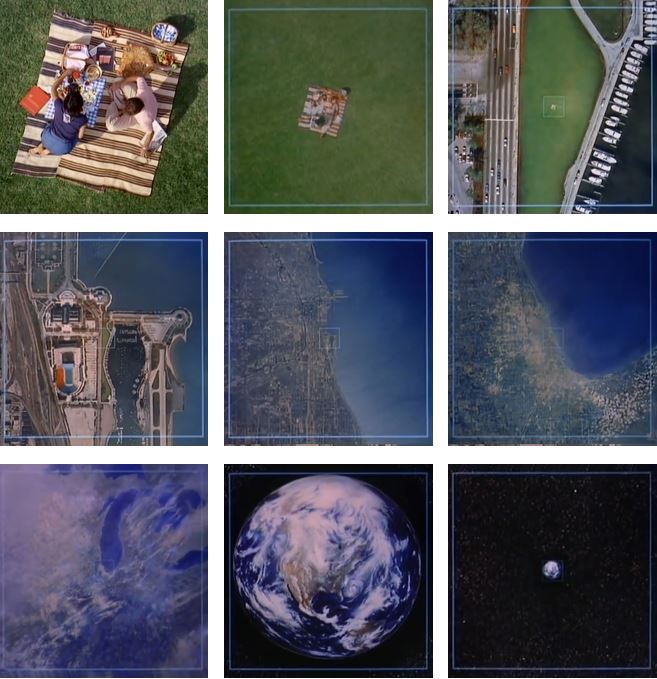
The solution is to project a new image just before the threshold point that has a higher resolution, a method known as the ‘Powers on Ten’, depicts the relative scale of the Universe according to an order of magnitude (or logarithmic scale) and based on factors of ten.
This method is used extensively in films where the camera needs to push, in an extreme way, into an environment.
Conclusion
In all cases the solution is to create more projections, although it is apparent that this needs to be done based on thorough knowledge and understanding of camera projection workflow.
It is also apparent that there is no ‘go to’ solution to this. Every shot must be analysed on its own unique conditions and a projection strategy formed from this analysis.
